Wednesday, December 5, 2012

Mayor's Car Textured

Finally got around to texturing the Mayor's car from Nightmare Before Christmas! So many things happened all at once, so I didn't have time to work on anything D,: Like..water leaking in my carpet right next to my computer..;_; Seems like everything is fine for now so I jumped on quickly to get some work done. Happy to say that I learned a few new things and improving on my textures. Must keep going!

I am quite happy with the results~

Autodesk Maya with Mental Ray render.
Textured in Photoshop.
Based on Disney's The Nightmare Before Christmas by Tim Burton.

Mayors Car- Front

Back view

Front view
Model Sheet


Wednesday, October 31, 2012

Happy Halloween!

Happy Halloween everyone! Here is the other model I've been working on for the holiday~
Model, UV mapping, lighting and rendering done through Maya with textures added through Photoshop.


Disney's Nightmare Before Christmas by Tim Burton.

Final Render of Zero's Doghouse


Occlusion Render

Wireframe on Shaded

Monday, October 15, 2012

The Mayor of Halloweentown's Ride

It's October and that could only mean one thing..Halloween! And when we think of Halloween, of course the first thing that pops into people's minds..or at least mine, is Tim Burton's, Nightmare Before Christmas. I thought it would be really cool to model The Mayor's awesome car in celebration of this holiday. It was so much fun modeling something so unique looking!
Here is the Occlusion Render of the model. More to come!

Movie- Disney's, Nightmare Before Christmas. Tim Burton.
3D Model- Julie Shah


Friday, July 6, 2012

'T Bootje building in Antwerp

It's been a while! I am happy to say that I finally finished my building model. This building is called   " 'T Bootje" located in Antwerp, Belgium. Art Nouveau Style.

This was a challenge for me, because I have never modeled something with this degree of detail. Art Nouveau is a style that has grown on me ever since my friend, Angela Song, recommended it to me when I was trying to find something unique to model. So thank you Angela! I can't wait to texture this..along with the rest of my pieces haha.


Front view
wireframe on shaded
side view
wireframe on shaded
Art Nouveau Lamp

wireframe on shaded


Tuesday, May 22, 2012

Steampunk Gun

 Steampunk gun modeled in Autodesk Maya. This was such an interesting design, I just had to go at it and start modeling! I tried applying some basic textures and rendered it out in MentalRay. I think it came out rather nice with the help of my Maya Professor. Definitely going to learn texturing better!

3D Motorcycle


One of my first models I attempted when I decided to go into 3D Modeling. Truly it was a challenge but that made me even more excited to finish it! My lighting has gotten better then before I have to say, now on to the next task, texturing! :D


Saturday, April 28, 2012

Luma and 1UP Toys

Crocheting has become one of my favorite hobbies since about 2 years ago. I love it! It's so much fun creating and attempting to make your own toys! One of my very first attempts at crocheting was my Green Luma and 1UP mushroom toys. Few challenges here and there but the outcome came out rather nice. :3

Mario Toys

Lumas and 1UP Mushroom


Wednesday, April 25, 2012

Mmm..Tarts

Another 3D Model! This time, chocolate tarts with raspberries~ :D I might as well model a whole tray full of delicious sweets..actually..might just do that. Lol. The room environment that the tarts are placed in still need work actually, so just a sneak peak! Enjoy!

Tarts

Tuesday, April 24, 2012

New Fruits!

So I decided to go back and model my fruit bowl again because looking back at my old Fruit Bowl, I thought "I can do better!" Lol
Anyways, I modeled it on Autodesk Maya using Nurbs and Polygons.

I have been focusing on making myself a better Modeler, however at the same time learning different types of textures and lighting. I have to say, its hard learning about textures and lighting (props to the lighting and texturing department at the studios!), but I love learning new things so I am willing!

Wireframe on Shaded


Occlusion Render
Fruit Bowl


Friday, January 27, 2012

Figure Drawing 2 hour Pose

Figure Drawing 2 hour pose


During Figure drawing class our model posed for the entire 2 and a half hours with breaks in between of course. I did several different drawings slightly different from each other as a study. This was really fun! I really need to walk in this semester and continue figure drawing as much as I can. <3

Box Figures

Box Figures for Figure Drawing Class
My final project for Figure drawing class was to use at least 5 figures in a drawing in any medium we want. I decided to draw box figures in ink because its something I have never done before. I also feel comfortable drawing box figures because it helps me determine the angles better. I regret not having a clear background in this project, however I believe it came out rather nice.

Once I have a suitable camera, I'll go back and get a better shot of this drawing. Sorry for the greyness! ;-;

Charcoal Woods~

Here's a project I worked on for my Figure drawing class! It was mostly to understand values and shapes and create an image out of it. I made many thumbnails during class to get an idea about values and shapes until I finally liked the drawing below. For the final project, I combined two of my thumbnails together to come up with a slightly altered version. Charcoal was very fun to work with during this project! My professor's only critique was that the trees combining in the background seemed to be forced upwards and not to have a clear definition of the ground as it recedes into the mountains. He really loved my 'hidden' animal in the entire portrait and my values came out pretty nice as well. 

I would love to go back and fix the problems he addressed once I have some time! Must improve! <3


Thumbnail of Project

Final Project

Tuesday, January 24, 2012

Sugarcube Corner for Game

Side View of Sugar Cube Corner for Game based on My Little Pony

Sketch of Front View
Front View of Sugarcube Corner


Another My Little Pony based art for the fan game I am helping out with. This one is Sugarcube Corner. I could only find side views of this house/shop. Originally I had done a side view of it, but after being told that everything had to be front view, I re-sketched the entire thing and made another one, which is the last image.

The reason why the first image looks a little 'destroyed' is because I was told that the game is about a fan fiction based on My Little Pony. In this fan fiction though, slowly everything starts falling apart into a grim world. While working on the front view image, he asked me to keep it clean and neat like the show has it. 

Random Doodling!

Sketchyness of..Random stuff

Hm, well what can I say? I was bored and started doodling! This was done during one of my art classes when I noticed I still had Adobe Flash open haha. Originally I was just randomly drawing circles using the Wacom Tablet, and then..this came out. Enjoy!
 

Made it to the Park!

Aaaaaand from the woods right into the park! This took a little longer for me to do, only because for some reason most of the background looked pixely..o: However, I got through that problem and am quite proud of it. ^^ The path where the apple trees show up in the background was added on, so it's not totally according to the My Little Pony show.


Path continued into Park: based on My Little Pony Show

And into the Woods~

Fluttershy's Cottage was the first part of the path, next comes the woods area. The only trouble I was mostly having was lining up the two images together so in the game it would look like one single image. :3 Although, I don't watch the My Little Pony Show, I do like the simple look they give to their background. The colors are very nice and the style of the background looks neat too. ^^
Path continued based off of My Little Pony Show

Fluttershys Cottage~ For Game

So recently, I have been helping out with a game project for someone I know. This 2D game project is based on the show "My Little Pony: Friendship is Magic". Yes..you read it correctly, its about ponies haha. Anyways, the game is mostly to test his skills with coding and I wanted to help out any way I could.

I was asked to make a path where his pony would walk on, along its journey based on the show. I got some references from the show and tried adding my own touch. I sketched out everything on Photoshop and then used the pen and gradient tool for the finished look. I think it turned out rather well. :3

By the way, this is more of a 'fan' art.

Fluttershy's Cottage path for game, based off My Little Pony Show

Avatar Art

My avatar on GaiaOnline

Over winter break I was playing around with my Avatar, trying to give her a new look from my usual. And she ended up as a waitress! Actually..I was inspired with the Cake Mood Bubble item and all the yummy looking sweets! <3 So..yes..cake anyone? :3

Saturday, January 7, 2012

Knight Practice Animation

While I was modeling my chessboard for my room, I wondered what it would be like if these chess pieces suddenly started attacking! So I quickly added joints, weighted the Knight down and decided to see for myself just how it would look. It's very short clip of the Knight jumping over its comrades, since it was just a practice test really, but I think I might go ahead and animate them!

 
 3D Model Knight Jumping

Friday, January 6, 2012

3D Modeled Chess Board

3D Modeled Chess Board with Pieces

After taking several Maya classes at CSUN, I realized how much I really love modeling, especially with props and background. I love putting details into each model and how intricate I can make them.
Recently, I have been working on a 3D modeled room and here's one of the props in it. A chessboard with all the chess pieces.

At first, I was really confused on how to go about making these chess pieces, but after trying out a few methods out I finally liked what I came up with! This is by far, one of my favorite models. :3

Surrealism Manipulation

Here's another project we worked on in Art 200. Creating a surrealistic image using a number of different pictures and combining them.

Surrealism Project for Art 200

Photoshop Series

A few years ago I took an Art 200 class, which is basically learning Photoshop. Although, I had experience with Photoshop before, I still learned a lot in this class! I don't see why a lot of students don't want to take this class as a per-requisite :/ It was fun! I learned how to use my new best friend, the Pen tool on it, and some tricks and tips on Photo manipulating! I was glad that the professor also required us to learn a little bit about Illustrator and InDesign, however I wish we went over those two programs a little more. None the less, it was a great experience.

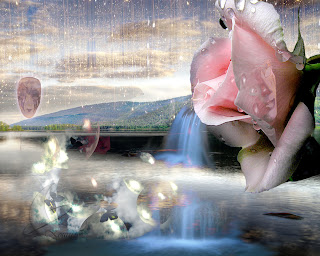
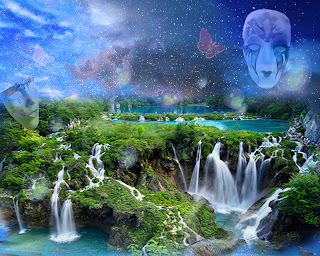
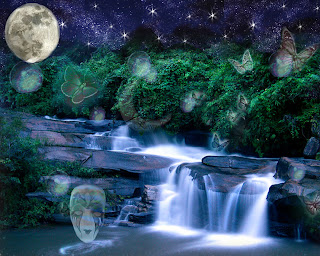
One of our tasks was to create a series of three images that fit well together using several different images and combining them on Photoshop. I chose Waterfalls and masks as my theme and came up with this after finding beautiful pictures of some. I'd like to go back and work on it again one day.


Waterfall Series 1

Waterfall Series 2

Waterfall Series 3